
I’ve been battling with lower back issues for years, but in the summer of 2018 they became quite bad. I started to re-evaluate how I was working. I knew prolonged sitting isn’t good, and is stressful on the lower back. There are a myriad of studies on the dangers of prolonged sitting. As my chiropractor put it, “We’re meant to move.”
I researched several different configurations:
- Converters (those “portable” units that sit on an existing desk).
- Hacking my own.
- Crank desks.
- Electric desks.
I didn’t want to spend too much money in case this didn’t work out for me. I also didn’t want to cheap out, and have an inferior product taint the whole experience.
The converters were too small for me. They seemed geared more towards using a laptop. I needed to place my 27” iMac, speakers, lamp, and assorted bric-a-brac.
I also looked at the crank desks, but decided the cost savings weren’t worth the inconvenience of the manual adjustment (more on that later).
While hacking my own desk sounded like fun, I’d be left with a “static” desk. Then there was the challenge of finding the right pieces to fit together. While there are a bunch of plans online for hacked IKEA standing desks, many are out of date, and the parts are no longer available.
My biggest worry was that using a standing desk would mess up my “flow”. Would it feel so weird that I would have difficulty concentrating? I’ve been sitting to do work for decades. It would be a big un-learning process.
I decided to purchase an electric model from AnthroDesk in Toronto. I always like to support a local business. Plus, they have a 30 day money back guarantee.
I went with a programmable dual motor model. I wanted to future-proof the set-up as much as possible. A dual motor is better able to handle a larger load. The particular model I got can hold up to 135kg (about 300 lb.) The legs can also expand up to 160cm (63”) wide.
I like to work at a larger desk. It gives me room for multiple tasks—using my iPad, sketching in my analog notebook, photographing items for my blog, etc … I know I can get a larger tabletop in the future, and the stand can handle it.
For the present, I wanted to work with what I had. I already had a large, sectional IKEA Gallant desk that I wanted to keep largely intact. I ended up replacing a set of the IKEA legs with the new, standing desk stand.
The assembly was fairly straightforward. There were a few steps with the Chinglish instructions that didn’t make sense at first, but we figured them out. It helps that I have a technically-inclined GF.
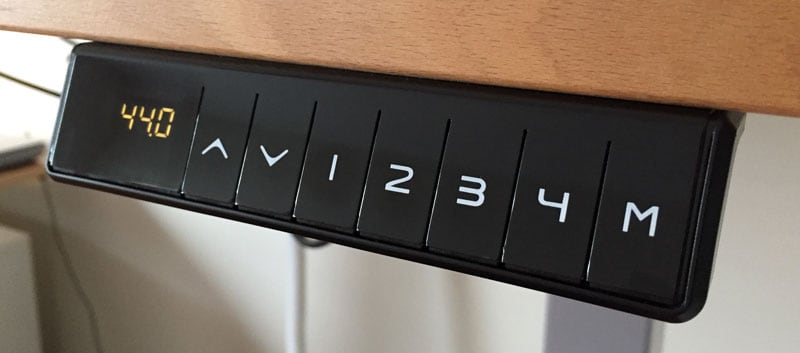
Getting back to the crank-thing—If it’s in your budget, go for an electric model. The thing I love about this desk are the programmable level settings. The control panel on my particular model lets me input four.
I have three programmed:
- Sitting: 28.3” (72cm)
- Standing (Normal): 44” (112cm)
- Standing (iPad): 46” (117cm)
The arrow keys are used to set the desired height. Then the “M” key is pressed and held until it flashes. After this you can press any of the numbered keys to lock in the setting.
The sitting setting puts the surface in line with the rest of my desk.
The standing (normal) setting is for using my keyboard and mouse. It puts the surface just below my elbows.
The standing (iPad) gets me a bit closer to my iPad when I’m working in Procreate. I found I was hunching a bit with the height set to 44”.
Pay close attention to the wiring if you’re going to be using a computer and peripherals. In my particular setup, the gap between the lowest and highest setting is 45cm (about 18”). Make sure there’s enough slack in the wiring and that it doesn’t get hung up on anything. I used IKEA’s Rabalder accessory to tidy things up. This portion is a work in progress. I’ll likely be adding a cable organizer box to hide that spaghetti of wires.
I would also strongly recommend getting a sturdy floor mat. It will help reduce fatigue. The drawback is you will need to slide it out of the way if you want to sit.
How did it go?

At the time of this writing, I’ve been using the standing desk for about 2 1/2 months. At first, I figured I would transition into it slowly, by standing for 10 minutes, then sitting for 20.
Even on the first day, I found I could comfortably stand for hours. This was a surprise.
The “flow” issue I talked about earlier did happen a bit. While stamina-wise I could stand for prolonged periods, it just didn’t feel natural at first. Over the next few weeks it became less noticeable. Now, work feels the same whether I’m sitting or standing.
When I’m sitting, inertia takes over and I will rationalize about having to get up to do something else. There’s a great freedom in simply walking up to and away from the desk. It makes me more active. It’s a bit like being the captain of a ship on the bridge. Or like Worf standing at tactical on the Enterprise. He never did get a chair.
A good pair of shoes is important. When I was sitting, I used a cheap pair of slip-on canvas shoes. There’s just not enough support in those for prolonged standing. I now use my Eco walking shoes when I work. They’re a bit clompy around the house, but my feet feel a lot better.
If you’re not sure about the whole standing desk thing, but want to try it out, you could put a large box on your desk and put a shelf or other surface on top. You could even put another piece of furniture, like a small cabinet, on top of your desk. Ergonomically it’ll be awkward, but it may give you enough of an idea to see if the concept works for you.
NOTE: The drawer accessory is IKEA’s Alex Add-on unit. This worked out perfectly, as it was the same width as the table, and let me hide all my stuff. It also put the monitor at a more comfortable angle for viewing.