
Back in college, light tables were as high tech as we got. They were big, metal beasts, filled with fluorescent tubes. Over time, as tubes want to do, they would start to flicker and fluctuate. Our classroom only had one, so there was always a line-up for it.
When I started getting into lettering, I knew I would have to get a light “table” at some point. Tracing paper works fine, but a light table is a huge step up.
I knew the technology had advanced. Tubes were out and LED was in. At first, I checked out my local art supply store. After hyperventilating over their prices, I checked out reviews on Amazon and came across the Huion A3.
Here are the specs off the amazon.ca page:
- Net weight: 1.6kg (3.5 lb)
- Dimension: 480mm x 360mm x 8mm (18.9″ x 14.2″ x 0.31″)
- Active area: 330mm x 415mm (13″ x 16.3″)*
- Light source of: LED
- Working voltage: DC12V
- Rated power: 5W
* I measured the active area as 315mm x 430mm (12.4″ x 16.9″).
I’ve been using this pad for two years now, so any pics will not show a brand new, out of the box product.
Included in the box:
- AC adapter with 1.8m (6’) cord.
- Carrying Bag.
- A few sheets of tracing paper.
- Rubber “feet”.
The carrying bag (below left) barely qualifies, in my opinion. It’s oversized for the pad, and really doesn’t offer much protection aside from scratch resistance. It looked to me like it was an off the shelf item and they just threw it in the box. I wanted something with a bit more protection, so my GF made me a custom felt case (below right). Pretty darned awesome.

The set-up is pretty straightforward. Just plug in the adapter to an AC outlet, plug in the adapter to the top left of the pad and press the power button (below left).
I do find the power port to be sensitive to movement. Bumping the plug or cord will make the display flicker. I suspect the plug does not fully seat into the port (you can see a bit of a gap in the photo). I’ve been meaning to take an x-acto knife and trim away some of the rubber at the base of the plug. I would consider this a niggle, and not a major problem.
Each separate press will alternate the intensity level up or down. You simply lift your finger off the switch when you’ve reached your desired intensity level. I can never remember which way the intensity level is going, so I just get used to fiddling with it until I get it to where I want it.
A single tap of the button will turn the pad on or off, and will remember the intensity setting. At the highest setting, if I tap once, it will take about 3 seconds to reach that level. When I tap off, it will take about 3 seconds to power down.
The rubber “feet” (below right) are two hemispheres that interlock together, forming a single sphere.
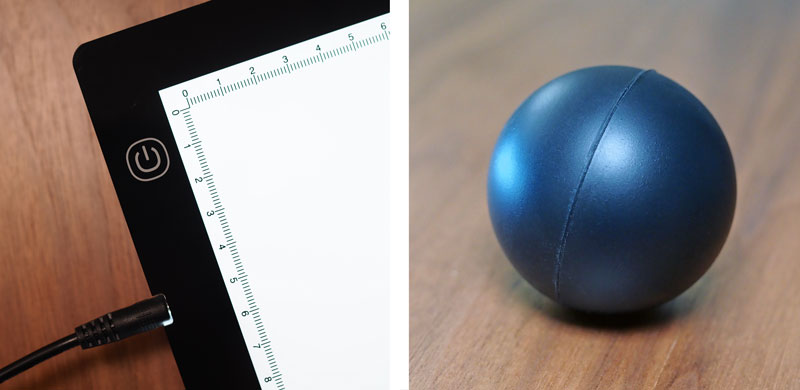
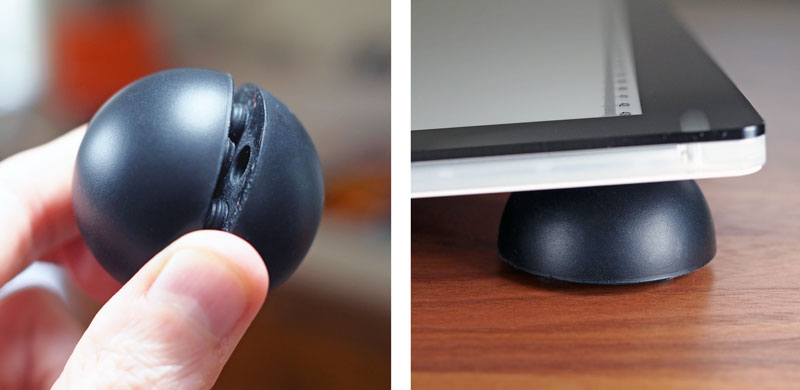
At first, I wondered why they would put a rubber ball into the box. It took a bit of fiddling before I discovered that you had to squeeze the ball along the “equator” to pull them apart (below left). Huion’s documentation calls this part a “puck”. Um. Ok.
If you prefer to work on a flat surface then the feet aren’t required. If you’d rather have your work surface at a bit of an angle, then place the hemispheres under the top corners of the pad (below right). It will raise the top by about 3cm (1”). Not dramatic, but I find it enough for me. If you want a steeper angle, you’ll have to find another means to augment it. I’m sure a couple of sturdy books under the feet would do the trick.
The light is evenly distributed, right to the edges. The unit will warm up a bit, but I haven’t noticed any hotspots. I’ve never had it warm up to the point where it was uncomfortable to work. It does flex a bit, but it’s not anything I’ve consciously noticed while working.
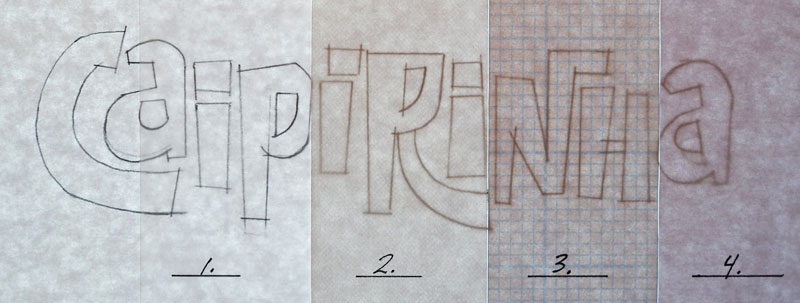
On the image below, I’ve placed a pencil sketch drawn on Staples 24 lb Laser and set the Huion to its highest intensity. On top I placed four samples to show the level of transparency.
- Canson 25 lb Tracing paper
- Bienfang 100% Rag Marker Paper
- Bienfang Gridded Paper
- Staples 24 lb Laser
As expected, the tracing paper is almost 100% transparent. The other samples ramp up in opaqueness with the Staples laser paper being the most opaque.
To sum up:
Pros
- Inexpensive
- Slim profile
- Consistent light
Cons (sort of)
- Power adapter sensitive to movement
- Non-adjustable oddball (literally) support feet
Even considering the weird “puck” and wobbly power adapter, I would consider this one of my most loved pieces of drawing equipment. It sets up quickly, is low profile, and puts out a phenominal amount of light.
Having one of these in my college class of 1984 would be like something from Star Trek.